In Adobe After Effects, an anchor point refers to the point around which a layer or object rotates or scales. It acts as a pivot or center point for transformations.
What is the Anchor point?
When you adjust the position, rotation, or scale of a layer, it is done relative to its anchor point. So, you have to set the anchor point before the other Transform properties.
By default, the anchor point is located at the center of the layer, but you can change its position to achieve different effects and transformations. For example, if you move the anchor point to the bottom-left corner of a layer, rotating the layer will make it rotate around that corner.

In the rotation property, the layer rotates around the anchor point. Also, in the scale property, the resize is applied from the location of the anchor point on the layer.

In the position property, the position of the layer is set based on the location of the anchor point. If you animate the position property, you will see the anchor point of the layer moves on the path.
How to change the anchor point?
To modify the anchor point, you can adjust anchor point property in transform section. You can press the keyboard shortcut “A” to show the anchor point property in timeline then you should adjust two numeric boxes for the x and y anchor point coordinates.
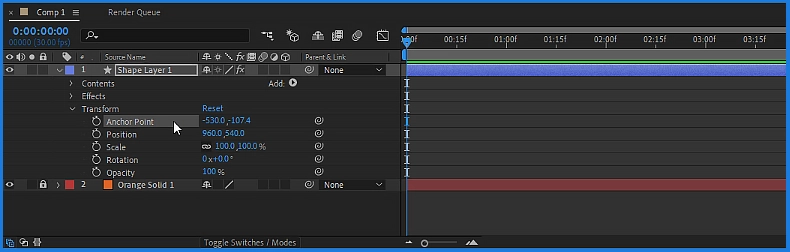
By changing these numbers, the anchor point remains in place and the shape is shifted so that the ratio of the shape position and the anchor point is adjusted correctly.
Another way to modify the anchor point is to use Pan Behind tool. Select the layer in the After Effects timeline, and then select the Pan Behind tool in tool bar, or press the keyboard shortcut “Y” to activate it, now you can click and drag the anchor point to a new position within the layer. Using Pan Behind is an easier way to set the anchor point.
Some useful shortcut keys
By pressing the shortcut keys “Ctrl + Alt + Home” set the anchor point in the center of your shape. by pressing “Ctrl + Home” you can set the anchor point in the center of the Composition.
There are also plugins and scripts to set the anchor point that you can use. In the tutorial video below, I have introduced one of these scripts to you and taught you how to work with it.
At the end remember that, understanding and manipulating the anchor point is essential for precise positioning and animation control in After Effects.
For better learning, we suggest you to watch the tutorial video: Anchor Point in After Effects
Suggested tutorials: