Tracking is one of the most important things that you should learn in After Effects. Tracking has various uses in After Effects. There are also different types of tracking. In this tutorial you will learn Motion Track.
Motion Track
In motion tracking, by tracking different points of an object, we can find out how it moves and apply its movement to other objects. So, it’s better, before you begin tracking, view the entire duration of the shot to determine the best features (object) to track.
Note that: What is clearly identifiable in the first frame may later blend into the background because the angle, lighting, or surrounding elements have changed.
A good tracked feature has these characteristics:
- Visibility for the entire shot
- A contrasting color from the surrounding area in the search region
- A distinct shape within the search region
- A consistent shape and color throughout the shot
In the Tracker panel (you can open it from the Window menu), after selecting the Motion Track and selecting transform for the Track Type, 3 options of Position, Rotation and Scale will be shown to you. Depending on the type of object movement, you can enable one, two or all three options.
For example, if you enable only Position, you can only track the movement of the subject up, down, left or right.
There are 4 steps to tracking:
- Setting Track Point
- Analyzing Track Point
- Editing Track Point Analysis
- Use Tracking Data
Setting Track Point
Step1
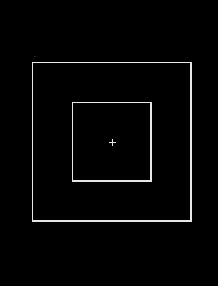
Depending on whether you want to track the Position, Rotation, and Scale, one or two track point(s) will be created for you. There are two squares in Track Point. The smaller square called Feature Region and the bigger square called Search Region.
In the Feature Region, you should place the element or object you want to track, and in the Search Region, introduce the area where the after effect should look for the object or element to be tracked. In the center of Feature Region, there is a small + sign, which is called Attach Point. The attach point is where the target layer will be placed.
Analyzing Track Point
Step2
After setting the Track Point to continue the process, we need to analyze the Track Point. We do this by the analysis buttons in the Tracker panel. Analyze Forward, Analyze Backward, Analyze 1 Frame Forward, Analyze 1 Frame Backward.
In this step, the movement of the object in each frame is checked and tracked.
Editing Track Point Analysis
Step3
Notice that sometimes because of different reasons, After Effects may not be able to do the tracking properly. When the analysis begins to fail, return to the frame where tracking was still accurate and repeat the adjust and analyze track point(s).
Use Tracking Data
Step4
Finally, there are different ways to use tracked data. (One of the most common ways is to use Null Object.) To apply tracked data you should press Edit Target bottom in the Tracker panel.
One of the most common ways is to use Null Object. you can apply tracked data to a null object and then set that null object as a parent for your final layer.
Note that: If the tracking encountered an error and it have not acceptable quality; You can take a look at the Option section in Tracker panel and change some settings.
For better learning, we suggest you to watch the tutorial video: Motion Tracking in After Effects
Suggested tutorials: