In this tutorial, we want to introduce you to Photoshop 3D. In this tutorial, we will examine the workflow of creating a simple 3D object in Photoshop 3D.
Note that the purpose of this tutorial is not to teach Photoshop 3D completely, but to create a general familiarity with this useful feature of Photoshop in the shortest possible time. So, in this tutorial, we are going to make a chess piece in Photoshop 3D.
The workflow includes the following:
- Make a path to convert it to primary 3D model.
- Convert the path to a 3D model.
- Modify the primary 3D model.
- At the end, if you want you can set the material for your object.
Photoshop 3D | Make a path
First of all, you need a path. There are different tools and methods to create a path in Photoshop. You can use the Pen tool, but in this example, we used a smart method.
First, we select the area that we want to be a path. (There are a variety of tools to selection in Photoshop.) After selecting the desired area, by right clicking and selecting “Make Work Path…” option, the selected area will be converted to path.
Photoshop 3D | Convert the path to a 3D model
After creating a path, you need to convert it (the path) into a 3D object. It’s as simple as a few mice clicks. So, navigate to the 3D menu, then select “New 3D Extrusion from Selected Path”.
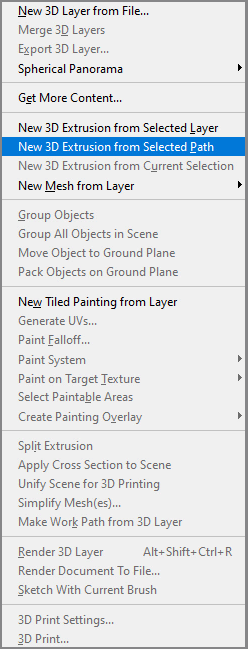
We suggest you to create a new layer before doing this and select it, then navigate to the 3D menu…
After selecting the option, Photoshop will ask you to switch to the 3D Photoshop workspace. If you select yes, your workspace will change to Photoshop 3D workspace. (The new workspace may stress you a little, but don’t worry, everything will be under your control.)
You can navigate in the 3D environment with the help of widget which is located in the lower left corner of the screen by default.
In my opinion, the most important panels in the 3D workspace in Photoshop are the 3D panel and properties panel.
Photoshop 3D | Modify the primary 3D model
Now you can see the primary 3D model. Select your 3D object layer. (That layer you selected before navigating to the 3D menu and selecting the New 3D Extrusion from Selected Path option.) then go to the properties panel.
There are several tabs at the top of the properties panel. So, select the Deform tab. We will use this tab to complete the primary 3D model.
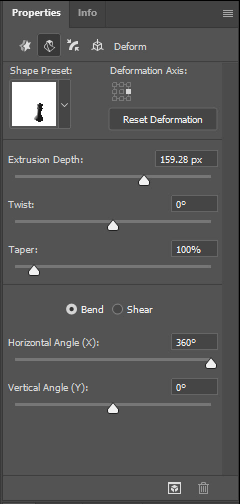
Now check Blend and set 360 degrees for horizontal angle then you should change deformation axis to complete your 3D Model.
Photoshop 3D | set the material
One of the good features of Photoshop 3D is the possibility of creating materials for the 3D model you made. You can create materials for different parts of the 3D model you made. (e.g., Extrusion, Front Bevel, Back Bevel, Inflation.)
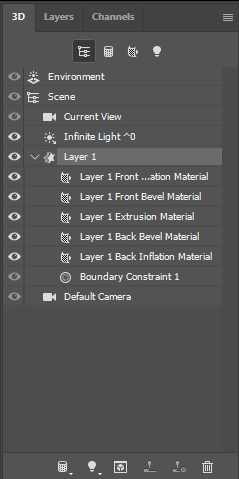
In this example we only have Extrusion. So, select Extrusion material from 3D panel. By selecting Extrusion material in the layer panel, the properties panel will change and the settings related to the material will be displayed for you. So, you can adjust the material from properties panel.
For better learning, we suggest you to watch the tutorial video: Create 3D Object in Photoshop
Suggested tutorials: